Phone 01 production

Shows samples to run a production in x4Trace.
Post Reply
x4Trace
Posts: 58
Joined: Fri Feb 14, 2025 2:24 pm

Phone 01 production

Post by x4Trace »

Open the Phone01 order in the x4Trace orders menu.

This order is prepared to start production.

Move all instances to the input of the first block.
Press the start instances button.
startinstances.png
startinstances.png (27.19 KiB) Viewed 2318 times
startinstances2.png
startinstances2.png (44.78 KiB) Viewed 2318 times
Generate order blocks from the flow blocks.
Press the generate button.
generate_blocks.png
generate_blocks.png (65.23 KiB) Viewed 2316 times
Now, you can design resources for these order blocks.
Last edited by x4Trace on Thu Apr 10, 2025 7:56 am, edited 2 times in total.
x4Trace
Posts: 58
Joined: Fri Feb 14, 2025 2:24 pm

Re: Phone 01 production

Post by x4Trace »

Open the "Matrix designer" and design resources to the "MP-Processor-Mount" operation. This is the first operation of this order. Select the "Phone" department in the matrix designer and press the refresh button.
gluingboardmatrix.png
gluingboardmatrix.png (43.97 KiB) Viewed 2315 times
Type 1 and 1 in the R. (Resource) and H. (Hours) columns and press enter.

Go to the task manager to start a process.
Assign a user to the previously created task.
1.Select the department.
2.Press the task's refresh button.
3.Select the "MP-Processor-Mount" task.
4.Press the add user button.
5.Refresh the user list.
6.Click on the user.
7.Select the user.
gluingboard_task.png
gluingboard_task.png (76.97 KiB) Viewed 2309 times
Start the process.
Start the T001 terminal in the "x4Trace Server Dashboard", to execute the task.
Select the operator's assignment, set the terminal, and press the Start (Play) button.
The process will be started on the T001 terminal.
gluingboard_startprocess.png
gluingboard_startprocess.png (135.47 KiB) Viewed 2300 times
Last edited by x4Trace on Thu Apr 10, 2025 7:56 am, edited 1 time in total.
x4Trace
Posts: 58
Joined: Fri Feb 14, 2025 2:24 pm

Re: Phone 01 production

Post by x4Trace »

Tracing data.
Press the "Data" button and fill in the fields.
gluingboard_processdata.png
gluingboard_processdata.png (15.53 KiB) Viewed 2293 times
Paste the codes into the code field in the following order to pass/assemble the instances.
gluingboard_addcodes.png
gluingboard_addcodes.png (19.32 KiB) Viewed 2293 times
PHP-00000 and press the "Add" button.
PHM-00000 and press the "Add" button.
PHB-00000 and press the "Record" button.

PHP-00001 and press the "Add" button.
PHM-00001 and press the "Add" button.
PHB-00001 and press the "Record" button.
...
PHP-00009 and press the "Add" button.
PHM-00009 and press the "Add" button.
PHB-00009 and press the "Record" button.

Stop the process.
gluingboard_stoptask.png
gluingboard_stoptask.png (15.55 KiB) Viewed 2291 times
You assembled all PHP, PHM, and PHB parts to PHB.
All parts passed to "MP-Board-Test" operation.
Last edited by x4Trace on Thu Apr 10, 2025 7:57 am, edited 1 time in total.
x4Trace
Posts: 58
Joined: Fri Feb 14, 2025 2:24 pm

Re: Phone 01 production

Post by x4Trace »

The next phase is the "MP-Gluing-Display" operation.
The order block has already been created.

Go to the matrix designer and design resources for the "MP-Gluing-Display" operation.
gluingdisplay_matrix.png
gluingdisplay_matrix.png (39.64 KiB) Viewed 2289 times
Go to the task manager to start a process.
Select the "MP-Gluing-Display", assign the "Operator 1" user to the task, and set the terminal.
Press the start task button.
gluingdisplay_taskstart.png
gluingdisplay_taskstart.png (56.37 KiB) Viewed 2283 times
The process has started at the terminal.
You must fill in the process data.
Attachments
gluingdisplay_data.png
gluingdisplay_data.png (9.43 KiB) Viewed 2281 times
Last edited by x4Trace on Thu Apr 10, 2025 7:57 am, edited 1 time in total.
x4Trace
Posts: 58
Joined: Fri Feb 14, 2025 2:24 pm

Re: Phone 01 production

Post by x4Trace »

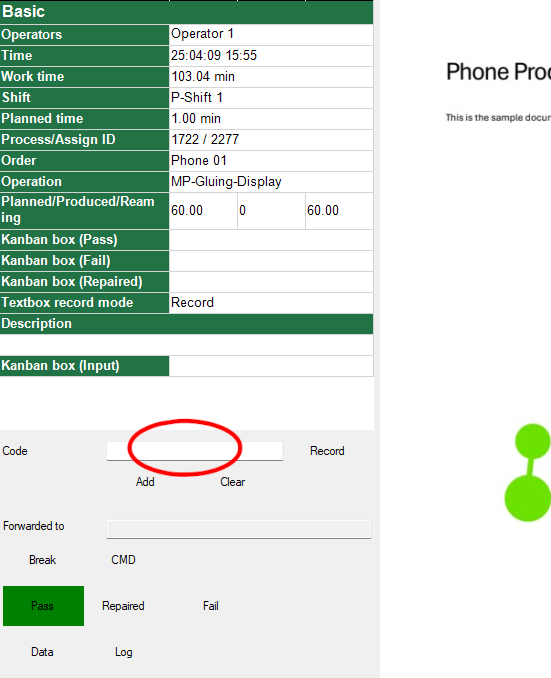
To pass the instances, add the codes to the code text box.
gluingdisplay_addcodes.png
gluingdisplay_addcodes.png (46.3 KiB) Viewed 2280 times
Paste the codes into the code field in the following order to pass/assemble the instances.
PHD-00000 and press the "Add" button.
PH-00000 and press the "Record" button.
There is a third part, the PHC-1. Since the PHC-1 is not traced by ID, it needn't be added to the codes. That will be automatically attached to the assembly.

PHD-00001 and press the "Add" button.
PH-00001 and press the "Record" button.
...
PHD-00009 and press the "Add" button.
PH-00009 and press the "Record" button.

You have to repeat these steps by operation.

The following steps are the same: design resources for the order block in the matrix designer, assign user "Operator 1" to tasks, and start those productions.

MP-Board-Test: Pass the following instances. (PHB-00000...PHB-00009), use only the record button at all instances. ("Add" button's use is unnecessary because this is not an assembly operation).

MP-Gluing-Board is an assembly operation that merges the phone case and the board. Pass the following pair of instances. (PHB-00000 (use "Add" button) : PH-00000 (use record button), PHB-00001 : PH-00001, .... PHB-00009 : PH-00009)

MP-Phone-Test is a non-assembly operation. Pass the following instances by using only the record button. (PH-00000...PH-00009).

Packaging: Pass the following instances by using only the record button. (PH-00000...PH-00009).
Post Reply